


How To Fit A Helmet
Step 1 - Measurement
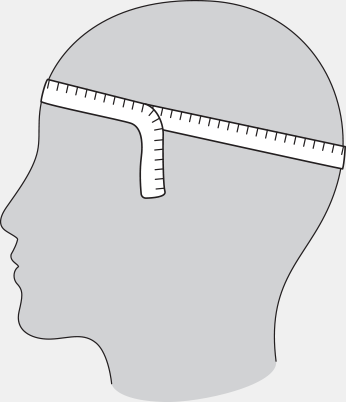
Measuring the head is a starting point for the entire sizing procedure. Due to varying shapes, heads that are apparently the same size when measured by a tape may not necessarily fit the same size helmet. The circumference of the head should be measured a point approximately one inch above the eyebrows in front and at a point in the back of the head that results in the largest possible measurement. Take several measurements to make sure you have the largest one.
Step 2 - Positioning
Once you have determined the measurement and consulted the Bell Racing sizing chart, select the helmet that is closest in size to the tape measurement and try on the helmet. If it is between sizes, round up to the next largest one. If you use a balaclava or head sock, always measure and fit the helmet with it on.
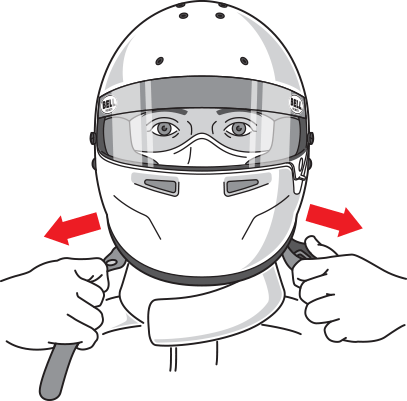
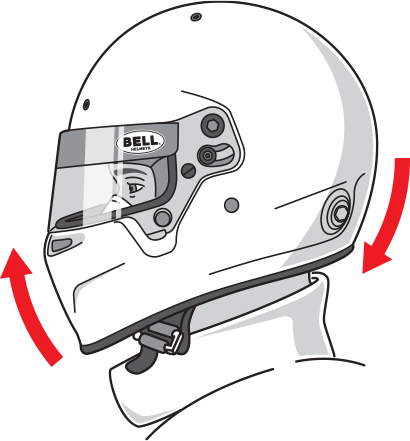
- Grasp the helmet by the chin straps, with the front of the helmet towards you and the top of the helmet facing down
- Place the thumbs on the inside surface of the straps and balance the helmet with the index fingers
- Spread the helmet apart with the hands and slip down over the head
See Illustration 2.
If the helmet slides down on the head with no resistance, you have your first indication that if may be too large. Obviously, if it will not slide down over the head at all it is too small. Many people who have not worn helmets are reluctant to pull down if they meet resistance as the helmet goes on, however if it is just snug going on, we recommend continuing to pull the helmet on. Only if the helmet is impossible to put on should you move to the next size, as helmets that go on snug generally fit very well once all the way on. In fact, most people will select a helmet that is too large for them if left to make their own choice. Keep in mind that padding tends to break in after extended use, so we recommend a snug fitting helmet. Helmets that are too large may not function as intended and in extreme cases may come off during an accident.
Step 3 - Fitting
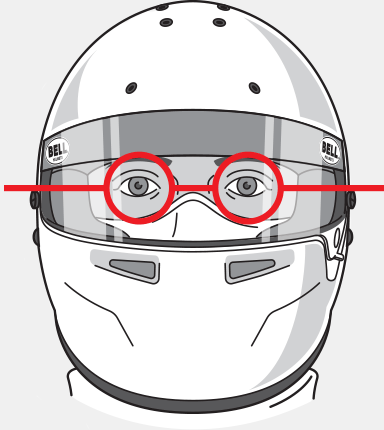
When properly positioned, the helmet should be worn low on the brow, eyes near the center of the eye opening, touching the top of the head with uniform and firm pressure all around – tight without excessive pressure points. See illustration 3.
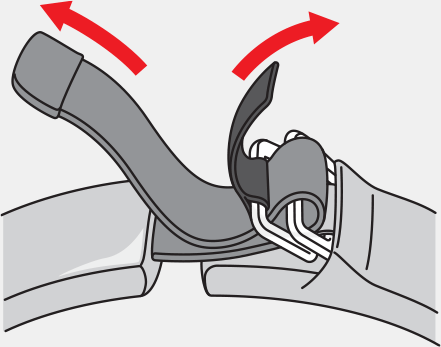
To fasten the chin strap, thread the end of the strap through both d-rings, loop the strap end back through the inner d-ring and pull it comfortably tight against the throat. Make sure the chin strap is snug against the throat. See illustration 4.

A good fit and a properly fastened chin strap are all that keep the helmet on your head during an accident. Make sure the chin strap is correctly fastened and pulled snugly up against your throat each time you hear your helmet. To correctly fasten the strap, buckle the chin strap as shown in Illustration 5, then adjust the side strap until the strap is snugly against your throat.
Step 4 - Checking The Fit
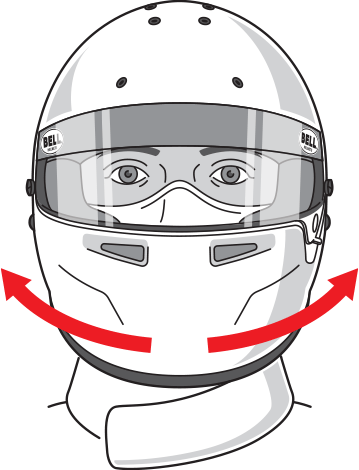
Correctly position the helmet on your head and stand in front of a mirror to check for horizontal and vertical movement. Check to see if the cheek pads are in contact with the cheeks. Is there excess pressure on the cheeks or are they too loose? Look for gaps between the temples and the fit pad. Check the back of the helmet where the neck roll (if the helmet has one) contacts the neck. Does it touch at all or is it pushing the helmet away at the rear causing it to roll down over the eyes in front? After this visual check, grab the helmet in your hands – one on either side – and while holding your head steady gently rotate the helmet first from left to right and then from front to back, as in Illustration 6 and 7. If the skin on your brow moves with the helmet as it is rotated, the fit is proper. If the skin on your brow does not move when the helmet is rotated in either direction or you can pull the helmet down in front of your eyes, the fit is too loose.
Check how the helmet fits in the cheek area. If the padding squeezes the cheeks causing excessive pressure it is too tight. If the cheek pads do not contact the skin or you can rock the helmet from one side to the other, it is too loose (Bell Racing makes cheek pad inserts to tighten the cheek pad fit and sells accessory face piece kits with various cheek pad thicknesses for drivers who have a standard size head but need reduced cheek pads due to a wider face or drivers who have a larger head but narrow face and need to increase cheek pad thickness). Try various sizes until you find one that fits correctly.
With the helmet properly positioned, and the chin strap fastened, try to remove the helmet from your head. Grasp it securely and make a serious effort to roll it off your head in both the forward and backward directions, as in illustration 7. If you remove the helmet or can roll the helmet backward far enough to expose your forehead or forward far enough to block your vision, the helmet either fits too loosely or the straps are not properly adjusted.
If the helmet is too large or if you can still remove the helmet, DO NOT use it and replace with a smaller size.
If the helmet is too large, repeat steps 1 through 4
If you cannot remove the helmet and it does not roll either backward far enough to expose your forehead or forward far enough to block your vision, you have a proper fit. Keep in mind we recommend fitting the helmet with a head sock or balaclava if you intend to wear one in competition.
To remove your helmet, unfasten the chin strap by pulling the red “D” ring tab outward (away from your face) to release the strap tension. See Illustration 5. To remove your helmet, grasp the chin strap halves in each hand and while pulling outward, lift the helmet from your head. See Illustration 2. Pull outward and lift from your head.
Finally, unfasten the chin strap and remove the helmet. Immediately after the helmet has been removed, observe coloration of the skin of the forehead and cheeks. A reddening of the skin in a small area may indicate a pressure point. Pressure points sometimes are not noticed by the wearer for several minutes or event hours later. They sometimes cause headaches and are at least uncomfortable. If you notice a pressure point but cannot remember experiencing discomfort there while wearing the helmet, put the helmet back on for a few minutes, paying close attention to the anticipated pressure point. If you experience complains of pressure point discomfort wither time, go to the next large size and repeat steps 2 through 4.
Step 5 - Test Drive
Steps 1 through 4 are critical to getting the most out of your helmet. Spend as much time as necessary to satisfy yourself that you have a good fit. Only after successfully completing steps 1 through 4, put on your helmet and wear it for an extended period or take a test drive. If the helmet feels comfortable, remaining firmly in place and the straps remained properly adjusted, your helmet is ready to use. If the helmet feels uncomfortable or moves excessively, go through steps 1 through 4 as necessary to correct the problem If you are unable to successfully complete all 4 steps, or if the helmet does not fit and feel comfortable, DO NOT continue to use the helmet. Either: Return to the dealer for assistance or contact Bell Racing for further instructions.
Do not use chin cups, wear the strap on the point of the chin or modify the chin strap in any way. This will increase the risk of the helmet coming off in an accident.
If you are not able to fit satisfactorily in one of our models, please call Bell Racing USA at 800-237-2700 or email us at info@bellracing.com for assistance.
| Standard Size | Hat Size | Inches | Centimeters |
|---|---|---|---|
| 4XS | 6 3/8 | 20 1/16 | 51 |
| 3XS | 6 1/2 - 6 5/8 | 20 1/2 - 20 7/8 | 52-53 |
| 2XS | 6 3/4 - 6 7/8 | 21 1/2 - 21 5/8 | 54-55 |
| XS | 7 | 22 | 56 |
| S | 7 1/8 | 22 3/8 | 57 |
| M | 7 1/4 - 7 3/4 | 22 3/4 - 23 1/4 | 58-59 |
| L | 7 1/2 | 23 5/8 | 60 |
| XL | 7 5/8 - 7 3/4 | 24 - 24 3/8 | 61-62 |
| 2XL | 7 7/8 - 8 | 24 3/4 - 25 1/4 | 63-64 |
| 3XL | 8 1/8 - 8 1/4 | 25 5/8 - 26 | 65-66 |
| 4XL | 8 3/8 - 8 1/2 | 26 3/8 - 26 3/4 | 67-68 |